Secrets of Mom Search Results

Wednesday, June 29, 2011

Free Family Friendly Activities in Utah-Summer 2011

While I was in northern Utah recently I discovered a few events that I would be likely to attend if I didn't live a solid 4 hours away. But I am certain that this information will be helpful to someone out there who reads my blog, right? Also, the more research I did on this, the more I realized I can't fit it all into one blogpost. Expect more to come.

Free Community Concerts- Utah Symphony

July 6- 7:30 pm @ Abravanel Hall
July 11- 8:30 pm @ Utah Cultural Celebration Center
July 13- 8 pm @ Sandy Amphitheater

Not something I would recommend for the whole family if your children are as young as mine, but a good date night. Call 801-533-6683 for more information

Free classes for kids

Chess for Kids- Orem Library- Story-telling Area
Thursdays 4pm-6pm- Volunteers help kids to learn and improve their Chess skills, bring your own board if possible

Children's Author Series- Orem Library- Story-telling Area
Thursdays 2pm- Top authors and illustrators teach kids about the process of making a book on Thursdays in June and July.

Other Free Events
American Freedom Festival- Balloon Fest: Bulldog Field, Provo
July 1, 2, & 4- 6:30- 8am

American Freedom Festival- Colonial Days: Crandall Printing Museum, Provo
July 1, 2, & 4- 10 am

Monday, June 27, 2011

Discovery Gateway Children's Museum

 Last week we were in northern Utah with our kids and thought we try out the Discovery Gateway Children's Museum. This children's museum is located in the Gateway Mall. Hours are from 10 am- 6 pm Monday-Thursday and 10 am- 8 pm Friday- Saturday. Admission is $8.50 for adults and children over age 1. Discounts for groups available. Parking rates vary, but you can get validated parking vouchers at the museum or stores throughout the mall. (With lunch and everything we were at the mall for four hours and ended up paying $2 for parking. Heaven compared to parking at the museums in Chicago.) The only coupon I could find was a 2 for 1 in the Salt Lake City, Utah Entertainment book. (You can get 17.5% back when you purchase Entertainment books through Ebates.) Occasionally there are free admission deals available, but I couldn't find any that haven't expired.
 My kids loved this place, but I was a little disappointed. I thought 'Wow 4 floors of children's activities!' But there isn't anything on the first floor and the fourth floor is just administrative offices, so it's really only 2 floors. Here are the basic features of this children's museum: a large ball and tube area, a construction block area, a farm, grocery store, a Lifeflight helicopter  complete with buttons and sound effects (I have to say that I thought that was pretty awesome), animation center, a digital media center, a large room that was full of different kinds of blocks and small building materials.  There was another temporary exhibit called "Play". There was one part of it that my husband and I couldn't figure out at all (was it broken?), and I thought that the explanations were way too preachy for the age group that they were supposed to be geared to. I did notice and appreciate that everything was very clean and there was hand sanitizer conveniently located throughout the museum. This is a big bonus for me. I realize that keeping things acceptably clean when you have activities that are geared towards little hands is no small feat, and I have been to museums who don't do as good of a job.

Sitting in the Lifeflight helicopter

If we were in the area again and had coupons, I may go again, but I don't think that it's worth paying full price for children and adults.

Friday, June 24, 2011

Food Storage Friday: Shepherd's Pie

 This is Thing 1's "favorite non-sugary food". And I love that it is super easy to make. I could probably get her to make it next time, if I cook the meat first, it's that easy. This is the way that my mom made shepherd's pie growing up and I love it, but I have since learned that shepherd's pie traditionally has green beans and some sort of tomato-based sauce. I really don't think that I could get my kids to eat something like that, but this way works for us. And when I take the leftovers to work I always get comments about how great it smells.


Shepherd's Pie
Food Storage Ingredients:
2 cans corn, drained
1 can cream of mushroom soup, undiluted
1 Tablespoon dried minced onions
3-4 cups prepared mashed potatoes

Fresh Ingredients:
1 lb cooked extra lean ground beef, drained
1/4 cup grated cheddar cheese

1. For bottom layer mix beef, onions and soup in a casserole dish. 2. Spread canned corn over meat mixture for second layer. 3 Spread mashed potatoes over corn. 4. Sprinkle with cheese. Cook until cheese is melted.

Usually I bake this in the oven at 350 for 15 minutes, but I'm trying not to turn the oven on these days. The dish I used was small enough that I cooked this in the microwave for a few minutes without any ill effects. Once I tried using half wheatberries to half ground beef. It was not a winner. The texture was just wrong. I also swear that I took a picture of this when I made it last, but it is MIA. I'm sure that you guys can use your imaginations to conjure it up in your minds.

Wednesday, June 22, 2011

Daikon Radish Pickles

Awhile back I got a few daikon (Japanese for "large root", and  they also made me think of "the radish spirit" in Spirited Away) radishes in my Bountiful Basket. When I saw it I thought "What is this and what in the world do I do with it?" I let them set in my fridge for almost a month before I forced myself to do something with them. Most suggestions that I found involved turning into sweet pickles or some sort of sweet pickle salad. I hate sweet pickles, so I kept searching. I found a recipe on Root Simple, that involved  cutting them into strips and pickling them.
 Now when I say pickling, I mean really pickling. Not the cold pack preserving that we Americans of the 21st century think of when we think of pickles, but letting the naturally occurring bacteria multiply and produce lactic acid. This lacto-fermentation is the same process that is used to make sauerkraut, Swiss cheese  and sourdough bread. This is the way that dill pickles are traditionally made.
  So I thought I would give it a whirl with a few minor modifications of my own.

Daikon Radish Pickles
Daikon radishes (I found that one and a half large radishes filled a jar, roughly 2 lbs)
2 small heads of garlic, peeled
1 teaspoon dried dill
2 Tablespoons sea salt (It is very important that there is no iodine in the salt.)
1 quart water

1. Mix salt and water. This will be your brine.  2. Cut radishes into small strips. 3. Stuff garlic and radish strips into a very clean quart mason jar. (I sterilized it just to be safe.) 4. Add dill and cover with brine. Make sure that all of the vegetables are covered with the brine, if they are exposed the entire jar may spoil. 5. Let set for 1-4 weeks depending on how strong you want your pickles to be.  Oh and your brine is supposed to get cloudy. That's how you know it's working, and if you put your jar through a hot water bath it will kill the bacteria that are doing the lacto-fermenting.  Refrigerate after opening.

When we opened them they popped a fizzed quite a bit, but tasted like pickles, only with a different texture. When I chopped up the radishes there was some leftover, so I ate a few raw. It kind of reminded me of a cross between jicama and a radish. Chopped a few into a salad.

Monday, June 20, 2011

3 Things That I Recommend to Every Pregnant Woman

I am pregnant with my third child, and there are few things that I wish I had known about the first time around that I thought I would share.

TKO Anti Burst Fitness Ball Set 65cm1. An exercise ball. My husband is a computer programmer which means that he spend a lot of time sitting at a desk. A co-worker recommended this for lower back pain. After trying it out he bought one for me too. Whenever I am sitting at a computer for more than 2 minutes I sit on this. It eases lower back and pelvic pain. Frankly it's a good idea for more than pregnant people, but especially for pregnant people. (And totally worth the $15-17)

2. A foam kitchen mat.  I have tile floors and standing in my kitchen for awhile really makes my legs ache. This isn't a cure-all, but it helps. And they're easy to clean too.

3. Stretchy maternity tank tops.  Why is that designers of many maternity shirts think that because I now have more cleavage than normal I want everyone to see it?  Besides covering up top, these tanks help cover that gap at the bottom, making my maternity and some of my regular clothes last a little longer.  I really don't get the maternity shirts that don't cover my belly. I figure other people want to see my stretch marks about as much as I do. I know that there are a few brands that specialize in maternity tank tops and belly bands. And the tanks run around $25 each. However, last week I went to Ross and found similar tank tops for $6 each. One size fits all. Now that's more like it. And I've tried the belly bands, they're not as magical as everyone told me they were.

Friday, June 17, 2011

Food Storage Friday: Banana Bread

This recipe is based loosely off of one from 101 Things to Do with a Cake Mix. (Which by the way I love.) There are probably banana bread recipes out there that are more wholesome and more strongly food storage based, but this one is so yummy and so easy. When we lived closer to my sister-in-law, she would baby-sit our kids in exchange for this banana bread.

Banana Bread
Food Storage Ingredients:
1 cup oatmeal
1 yellow cake mix
1 small box banana or vanilla pudding
1/4 cup oil
1/4 cup applesauce (I used some that I canned last fall, so yummy!)
3/4 teaspoon cinnamon
1 Tablespoon vanilla

Fresh Ingredients:
3 ripe medium bananas
3 eggs
1/2 cup water

1.Preheat oven to 350 degrees. 2. Mix all ingredients until smooth. 3. Divide between 2 greased bread pans. Bake for 45 minutes or until toothpick comes out clean.

Wednesday, June 15, 2011

Negotiating Savings

Monday was not the best of days for me. I had (still have) a kidney infection and was having contractions so hard and frequently I could barely walk. My husband was out of town on business and Thing 1 and Thing 2 were not on their best behavior. And my house was in a fairly pathetic state. Despite this I had a few  money-saving victories that I think illustrate the principle of "not just taking what you are given"and being assertive.

Victory #1- So I called my doctor to let him know that the antibiotic that I was on was not effective, at all. A few hours later his office called saying that they had called in a new prescription. When I went to pick it up my co-pay was $35 and change, for a generic mind you. I said "Wow, that is significantly more than the last prescription that I had. (It was only $4.) Does it make a difference if I use a different insurance company?"  "Well, let's see what we can do."
 Now I have been told before that for prescriptions, even if you have double coverage, they will only use one insurance company, and insurance company co-pays are pretty much all the same. But I thought I would check anyway. A few minutes later the pharmacy tech said "Ok, that will be $5." Wahoo! It doesn't hurt to ask. One question saved me more than $30.

Victory #2- My husband likes to build things and fix things. It comes in handy. Awhile ago he decided to invest in a few hundred dollars worth of tools. The store he bought them from had a promotion that if you put them on the store credit card (which he already had) and made minimum payments, you paid no interest for a year. So I set up automatic payments and forgot about it. (Oops!) A couple weeks after the complete balance was due I remembered my mistake. I promptly paid off the remainder of the principle, but discovered that my mistake had cost me more than $84. Ouch. So Monday while I was laying on the couch, and feeling unable to do other productive things I gave them a call. I apologized for forgetting to pay the balance in full on time and asked if there was anyway that I could get the interest reduced. I was put on hold for about ten minutes. When the man I spoke to returned he said that this one time they could waive all of the interest charges. Better than I had hoped for. And I didn't have to work that hard for it. I was ready to threaten to cancel the account, but that wasn't even necessary. One phone call saved me $84.

Victory #3- Last week my husband was in an accident. On the way home an elderly gentleman ran a stop sign and my husband was unable to stop soon enough to avoid hitting him and t-boned his car. Fortunately no one was hurt, for which I am very grateful. Our car was however totaled. Besides being very inconvenient, this is expensive no matter how you slice it. Our car is not worth what it would cost to replace and we recently we just put down a significant amount of money on new tires and other maintenance related things. Mrggg. If I had a crystal ball I wouldn't have put that money down. The adjuster from the other insurance company called and left a message while I was on the other phone. Before calling them back I called my insurance company wondering if they could give me a ballpark figure for what my car was worth. The quote he gave me was about $1600 more than my limited internet research had yielded. Now I don't know how much they are going to offer, but it's nice to have some information to leverage with. I figured my insurance company would be fairly straightforward with me. It doesn't cost them anything one way or the other. I called the other insurance company back and left a message, but they haven't called me back. Whatever, I keep the rental car until they settle things, and I know that the rental car is worth a lot more than my crunched car is. Potential savings from five minutes of my time: $1600.  Ha, ha, ha! Couch time can be productive. I saved more money than if I had spent the day working. :)

Here are some tips for negotiating savings.
  1. Ask nicely.
  2. Remember that businesses want to keep your loyalty and will often work with you to do so.
  3. Ask questions/ do research to make sure that you are well-informed.
  4. Credit card companies are more likely to waive interest and fees if you have a history of making your payments on time.
  5. Your first answer isn't always the final answer.
  6. You have little to lose in seeing if you can get a better deal.

Monday, June 13, 2011

Strawberry and Vanilla Sauce

I found this recipe in Homemade Living: Canning & Preserving with Ashley English: All You Need to Know to Make Jams, Jellies, Pickles, Chutneys & More, and when my best friend came to visit last weekend we decided to give it a whirl. It was so yummy! We made two batches, but I am wishing that we had made more. My family loves this. It's really great on waffles, and I'm sure it would taste great on vanilla ice cream or angel food cake as well. Perhaps if I catch up on the other many things that need to be done around my house I will make a few more.  The recipe in the book called for the seeds of one vanilla bean. I used one long vanilla bean and didn't feel like it was enough vanilla flavor, so I added a teaspoon of good Mexican vanilla and it was perfect.

Strawberry Vanilla Sauce
5 pints strawberries, hulled and sliced
1& 3/4 cups granulated sugar
1 cup water
3 Tablespoons bottled lemon juice
2 vanilla beans, sliced lengthwise (or 2 teaspoons high quality vanilla)

1. Sterilize jars, lids and screw rings. 2. Measure 3 cups of sliced strawberries into a glass bowl. Crush with a potato masher. (I used a plastic one for this and I really wish I had a metal one, it would have been easier.) 3. Combine water and sugar in a large saucepan over low heat. Stir until sugar is dissolved. 4. Add crushed berries and bring to a boil. Reduce to a simmer and cook for 7 minutes. Stir frequently. 5. Add remaining strawberries and lemon juice. 5. Scrape vanilla bean seeds from pod into pot. 6. Bring the mixture back to a boil and cook for 3 minutes. 7. Ladle into hot sterilized jars, leaving 1/2 inch headspace. Tighten until finger-tip tight. 8. Place in canner and process for 10 minutes in a boiling water bath. Makes 6-7 half pint jars.

Friday, June 10, 2011

Food Storage Friday: Beef, Wheat and Cheese Enchiladas

When my husband was growing up, one of this favorite foods was beef and cheese enchiladas. They're pretty straight forward- enchilada sauce, cooked ground beef, shredded cheddar cheese in a tortilla, smothered in more sauce and cheese. Bake until cheese is melted. They're all right; they're his comfort food, not mine. However, this week after he'd been in an accident, (An older gentleman possibly totaled our car, we're still waiting to hear.) I could tell that he needed some comfort food, so I made these with one significant change. I added food storage. Cooked wheat berries can be used to substitute part of the ground beef in a recipe, decreasing the saturated fat and increasing the folic acid and fiber content. I have tried just mixing wheat berries with the ground beef, however the texture just seemed wrong, but "mix it in a mincer and pretend it's beef" and it seems to work a little better. I can distinctly taste the wheat, but my husband still happily ate several. The same principle can be applied to many other recipes that call for ground beef.

Beef, Wheat and Cheese Enchiladas
Food Storage Ingredients:
1 cup cooked wheat berries
2 cups (approximately) enchilada sauce

Fresh Ingredients:
1 lb cooked ground beef (I prefer the extra lean variety)
tortillas (how many depends on the size, roughly one package of the 8" variety)
2 cups shredded cheddar cheese

1. Puree 1/2 cup enchilada sauce with wheat berries. (If your family is not used to eating cooked wheat, you may want to start with less than a cup so they don't have a fiber overload.) 2. Spread wheat mixture on tortillas, top with beef and cheese. 3. Roll and smother with remaining sauce and cheese. 4. Bake for 20 minutes at 350 or until cheese is melted.

Wednesday, June 8, 2011

Book Review: Canning & Preserving

Homemade Living: Canning & Preserving with Ashley English: All You Need to Know to Make Jams, Jellies, Pickles, Chutneys & More Recently I won Homemade Living: Canning & Preserving with Ashley English from The Morris Tribe. I have to say that I really enjoyed this book. It is full of recipes and tips for canning your harvest and is written in such a way that makes me totally excited about spending hours in my kitchen preserving local produce.  The way she describes it, it's more than food storage, it's an art form. I loved that the author included stories on the history of canning and explained the chemistry behind keeping your canned goods from spoiling.
Here are some of the tips that it included:
  • "Know why you are [canning], and be honest with the work it will require. This ain't no disco!" 
  •  "Always cook small batches, and always use a wide pan. Also only use the best fruit for preserves."
  • "Strawberry jam foams. A lot. No, really, a whole lot."
  • "Grocery stores are a convenience, but there is nothing better than homegrown or homemade food."
  • "Always remove the rings from my jars when storing; if anything spoils, the lids will come off. Food that is good will hold its seal."
  • "Can because you enjoy it, never make it a job or task."
  • "Keep your food preparation area clean, and always sterilize your jars well."
  • "Canning provides a means of dealing with an abundance of fresh produce. It tastes good, is healthy and saves money. It's the only way to eat certain foods."
  • "Always prep extra jars and lids. Yields can very according to the water content of the fruit or vegetable and how tightly they pack into jars."
  • "The canning process sometimes dictates it's own time line. You should have a meal plan that simple and easy and have some snacks nearby."

I'm not a total rookie to canning. I own my own canner and I can make some fantastic salsa and apple pie filling, but I have to say that I learned a lot from this book. After reading it I feel better equipped and more energized about canning. I recommend it to any one who is new to canning, anyone looking for a good canning reference or someone looking for a few new good ideas. (I'm excited to test out her recipe for peach lavender butter when peaches are in season.)

    Monday, June 6, 2011

    Heartsy: A New Way to Save Money on Gifts

    Heartsy - Daily deals on fabulous handmade items, at least 50% off. Last week I came across a new deal website: Heartsy. It's like Groupon, but they only offer deals on Etsy stores. All deals are at least 50% off and are generally offered for 24 hours, or until they are gone. There are generally 3-4 deals offered at the same time, and each day Heartsy will send you an email letting you know what the current deals of the day are.
     For those of you who are not familiar with Etsy, it's a marketplace for handmade items. You can find a multitude of different items, such as clothing, jewelery, gourmet chocolates, furniture, stationary, home decor and bath and body items. I have found many unique gifts that screamed 'Buy me for _____!' at Etsy. (And if you're going to find the perfect gift, why not save some money on it at the same time?)
     Sellers come to Heartsy offering a vouchers for discounts on their items for a limited time. And if you sign up through Heartsy you can vote on these deals so, they know which items you would be most interested in. Here are a couple of deals that I snagged last week. Bath and Body Items from Swan Mountain Soaps for 75% off and Gourmet Chocolates for 70% off from Sweet Sophia's Creations. (I was thinking Father's Day.)

    And if you click on this referral link and sign up for their email notifications you will receive a $5 credit, making the deals that much better. :)

    Friday, June 3, 2011

    Food Storage Friday: Mini Meatloaves and Mashed Potatoes

    Surprisingly of all my food storage recipes, my meatloaf is the biggest crowd pleaser (with the exception of my wheatberry salsa, but that's more a snack than a meal.) This is unfortunate, because I generally try to avoid preparing meals that involve me squishing my fingers in raw meat.  My in-laws (who as a group are generally against eating healthy) love it and every time I bring the leftovers to work, someone asks me what in the world I am eating because it smells amazing. Seems like good enough tests for me. I found the recipe that I based this off of in Taste of Home's Budget Suppers. Of course I cut down the salt, doubled the whole grain and changed things up a bit to turn it into something I would want to eat. The secrets that makes this meatloaf so great are:
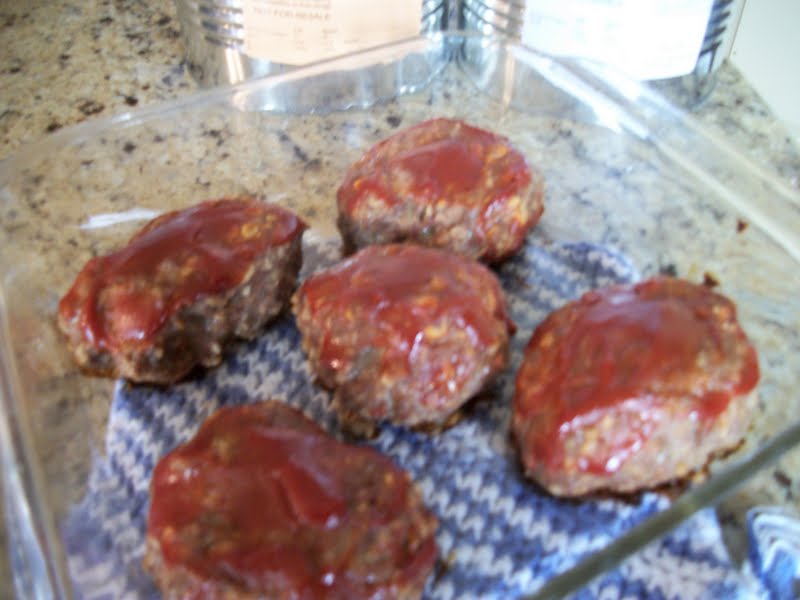
    1. The sauce on top
    2. They are smaller so they cook faster than the average meatloaf 
    3. The Worcestershire sauce inside to give it a little zip
    Mini Meat Loaves
    Food Storage Ingredients:
    1 1/2 cups rolled oats
    1/2 cup evaporated milk
    3/8 cup dried minced onion
    1/2 teaspoon salt
    1/4 teaspoon black pepper
    2 Tablespoons Worcestershire sauce
    1 Tablespoon brown sugar
    1/3 cup ketchup
    1 Tablespoon prepared mustard
    mashed potatoes, prepared according to directions

    Fresh Ingredients
    1 egg, lightly beaten
    1 1/2 pounds extra lean ground beef

    1. Mix oats, milk, egg, onions, salt, pepper and Worcestershire sauce in a bowl. 2. Mix in ground beef until mixed thoroughly. 3. Form into balls, (I make them slightly smaller than my fist, but I have small hands) I put a small dent in the middle with my thumb to thin out the part where the meat is the thickest to help make sure that they cook more evenly and also hold some of the sauce in. 4. Mix ketchup, brown sugar and mustard into a sauce and spoon over meatloaves. 5. Bake at 350 for 35-45 minutes. Serve with mashed potatoes and vegetables. Makes 10 mini meatloaves.


    Notes: I feel like this meal is somewhat higher intensity than I usually do, so I serve it with mashed potatoes, which are like the fast food of the food storage world. These also freeze and reheat well.

    Wednesday, June 1, 2011

    Preparedness Wednesday: May in Review

    For those of you just tuning in, every week I try to do something to get my house in order (fix things, get out of debt, etc) and purchase something to add to my emergency supply. If you want to follow my deals as I find them. I post them on my public facebook profile as I find them if you are interested.

    Doing:
    • Pulled and sprayed weeds like a crazy woman, paid the neighbor boys to pull more weeds and finally bought some industrial strength weed killer
    • Set up an appointment to visit the cannery next month
    • Read a book on canning and preserving
    • Hung up several pictures on my walls.
    Emergency Storage:
    • Case of Skippy Peanut Butter- $1.55 per jar (another fabulous deal from Amazon Subscribe and Save)
    • Case of various staples from the local LDS Cannery- I just walked in and bought a case of whatever was already canned, and now they let you put it on a credit card. Sweet!
    • Planters peanuts- $1.49 per 16 oz jar @ Albertson's
    • #10 can of biscuit mix- $9 @ Walmart- that plus cream of chicken soup makes a complete meal
    • New wheat grinder- my husband recently surprised me with this, it comes with much higher reviews than the last one I bought. I haven't had a chance to try it out yet.