Secrets of Mom Search Results

Showing posts with label Food Storage Friday. Show all posts

Friday, March 2, 2012

Food Storage Friday: Potato Pearl Soup

Ok,  if you have potato pearls you have to try this. To quote my husband "It tastes like Thanksgiving in a bowl." And it's EASY! If you don't have potato pearls, go get some.  I found this winner in Food Storage for the Clueless by Clark and Kathryn Kidd, which a friend recommended to me. Unfortunately it is out of print and it was awhile before a copy was available for less than $40. I eventually found one and I haven't really started reading it, just trying a few recipes. This soup is fast, easy, yummy and uses mostly food storage ingredients. I can't say that it's healthy, but it tastes like comfort food and sometimes you need that...like when everyone in the house has had a cold sometime in the past two weeks. Just saying.

Potato Pearl Soup
Food Storage Ingredients:
4 & 1/2 cups milk
2 Tablespoons dried chopped onion
1 teaspoon salt
dash of garlic salt
dash of pepper
2 cups potato pearls
2 & 1/2 cups broth/stock

Fresh Ingredients:
2 Tablespoons butter
1/2 cup water

1. Heat butter, onion, salt, milk and pepper until scalding. 2. Gradually stir in potato pearls. Keep cooking and stirring until smooth. 3. Gradually add the broth & water. 4. Garnish with paprika and parsley if desired.

The original recipe called for more salt and butter. I cut them down and still added the water to get it to a place where I liked the taste. I also used turkey stock that I made and froze after Thanksgiving last year. Hence the strong Thanksgiving flavor and the small bits of carrot. So yummy. The original recipe calls for chicken broth, so I'm sure that that is good too. You *could* use fresh milk for this, but when I make recipes that call for cooking more than 2 cups of milk, I mix it up from my food storage. It's cheaper, no one can taste a difference and I need to rotate the stuff anyway.

Friday, February 17, 2012

Food Storage Friday: Sweet Pepper Rice

I found this recipe on Skinny Bovine's Kitchen. She says this rice is drool-worthy. I have a hard time drooling over anything that isn't cheesecake, but it was definitely yummy. And unlike the Sweet Chilean Rice that I did a few weeks ago, it was actually sweet, but not too sweet. I served this with burritos, but it would lend itself well as a side to anything Mexican.

Sweet Pepper Rice
Food Storage Ingredients:
1/4 cup sugar
1/4 tsp garlic powder
1/2 tsp salt
1 1/2 cups white long grain rice
3 cups chicken or vegetable broth

Fresh Ingredients:
1/2 yellow onion
1/2 red bell pepper
1/4 cup cilantro
1 Tablespoon butter

1. Finely chop onion, pepper and cilantro. (Or if you're lazy like me, pulse them in the blender for a few seconds.) 2. Melt butter in a large pan and cook onion mix until onions are soft. 3. Add salt and garlic powder, cook for one minute 4. Add rice and cook for another 5-10 minutes. (Until most of the moisture is gone.) 5. Dissolve sugar in broth. Add to rice. 6. Bring to a simmer and then turn to low and cover. Cook for 25-30 minutes. Fluff with a fork. Serves 6.

Notes: I used half of an onion, instead of a whole onion, to increase my odds that my children would eat this. They tried it, but they weren't fans. My husband said that even half an onion made his eyes burn. I tried it with some peach salsa and that was yummy too. At some point I'll have to experiment and try this with brown rice.

Friday, February 10, 2012

Food Storage Friday: Squash and Bean Quesadillas with Apple Salsa

This recipe doesn't contain a "ton" of food storage ingredients, but it's tasty, healthy and a good way to mix it up. I found this recipe when I googled "the best thing to do with butternut squash". My husband hates squash and really liked this, so you know it's good. I have to apologize for the lack of picture. I made it when my family came to visit, and all portions were inhaled before I had a chance to take a picture, but here's where I found it. (Of course I changed it some.)The quesadillas without the fresh salsa are ok, but the apple salsa is what really makes this.

Squash & Bean Quesadillas
Food Storage Ingredients:
1 can (14.5 oz) beans, rinsed and drained (I used kidney)
1/2 teaspoon cumin
1 Tablespoon olive oil
salt and pepper to taste

Fresh Ingredients:
3 cups of cooked and peeled squash (I used butternut, the original recipe called for acorn)
1 medium onion, chopped
2 cups spinach, chopped
4 cloves garlic, minced
1 cup shredded cheddar cheese
12 small tortillas
Salsa
2 medium apples, diced
1 large handful cilantro, chopped
3 green onions, chopped
2 Tablespoons lemon juice
2 Tablespoons lime juice

1.Mix salsa ingredients and store in fridge. 2. Cook chopped onion & garlic in oil in a large skillet until onions are clear. 3. Add squash & spinach. Cook for 10 minutes. 4. Stir in beans, cumin, salt and pepper. 5. Spread 1/6th of squash mixture on a tortilla. Sprinkle with cheese and cook in skillet until cheese is melted. Cover with a second tortilla, flip and cook until second tortilla is toasted. Repeat with remaining ingredients. Cut tortillas into wedges and cover with apple salsa. Serves 6.

Friday, February 3, 2012

Food Storage Friday: Sweet Chilean Lime Beans and Rice

Recently I got a recipe exchange chain email from a friend of mine. I passed it on to several people in my address book including an old nursing instructor. She's currently serving a mission so declined to participate, but did give me this recipe for Sweet Chilean Lime Beans and Rice. I tweaked it so it worked well in my crock pot and had a stronger lime flavor. My husband (one of my toughest and most important food critics) loved it. This with a side of fruit makes a complete meal, but it would also go great as a side with enchiladas, tacos or chipotle seasoned and grilled meat. The lime and sweetness is subtle, but gives it a nice flavor. Honestly it has more of a pepper, garlic and onion flavor than sugar and lime.

Sweet Chilean Lime Beans and Rice
Food Storage Ingredients:
4 (15 oz) cans of black beans, rinsed and drained
7 cups broth (chicken, vegetable, whatever)
2 teaspoons ground cumin
1 teaspoon ground black pepper
3 Tablespoons white sugar
2 cups brown rice or 3 cups instant white rice
salt to taste

Fresh Ingredients:
2 green bell peppers, seeded, 1 diced
2 yellow onions, quartered
2 cloves garlic 
1/4 cup lime juice
1/2 cup champagne (I used sparkling red grape juice)

1. Put 6 cups of broth, beans and diced bell pepper in crock pot on high for one hour. 2. Blend onions, remaining pepper, black pepper, cumin, sugar, 1 cup of broth and garlic until smooth. Add to beans. 3. If using brown rice, stir into beans and cook for three hours. If not, just cook for three hours and add instant white rice ten minutes before done. 4. Half an hour before finished slowly pour in champagne (or juice) and lime juice. Makes 10 servings.
Notes: The original recipe called for instant rice. I really prefer brown, so that's what we used with my adjustment, but the instant white rice should work.

Friday, January 27, 2012

Food Storage Friday: Cranberry Upside-Down Breakfast Cake

I found this recipe in the newspaper a couple weeks ago and made it for my family last weekend (adapted using food storage). It was delicious and helped me use some of the very large bag of cranberries that I have in my freezer. (That's three experimental recipes in a row and they were all winners! Score!) My family made this disappear fast. We will definitely be making this again, but only for special occasions, because it is very sugary.

Cranberry Upside-Down Breakfast Cake
Food Storage Ingredients:
1/4 cup of chopped almonds
1/2 cup packed dark brown sugar
1/4 tsp cinnamon
1/2 tsp salt
1/2 cup whole wheat flour
1/2 cup oat flour
1/2 cup all-purpose white flour
1 tsp baking powder
1 cup white sugar
1 tsp vanilla extract
1 cup powdered sugar

Fresh Ingredients:
1/2 cup butter, divided & softened
1 tsp orange rind
5 Tbsp fresh orange juice
1 egg
1/2 cup buttermilk (I used rice milk with vinegar.)
1 & 1/2 cup fresh cranberries (or frozen and defrosted)
1 heaping Tbsp ground flax seed

1. Preheat oven to 350. Coat a 9" square or round pan with cooking spray and dust with flour. 2. In a small bowl combine almonds, cranberries, and orange rind. 3. In a small saucepan combine three Tablespoons orange juice, two Tablespoons butter, brown sugar and cinnamon. Stir constantly for three minutes and pour into pan. Cover with cranberry mixture. 3. Whisk flours, salt, flax seed and baking soda in a medium bowl. 4.In a large bowl, beat white sugar and remaining butter until creamy. Add vanilla, egg and flour mixture. Spoon over cranberries. 5. Bake for 40 minutes or until passes toothpick test. Cool in pan for 5 minutes while making glaze. 6. Mix remaining orange juice and powdered sugar until smooth. Pour over inverted cake.
Notes: I was surprised that it turned out looking as well as it did, because after I inverted it about 90% of the sugary coating was stuck to the bottom of the pan. Wha? I used a non-stick silicone pan and sprayed and flour it. So I scraped the sugary mess out of the pan with a fork and then arranged it back on the cake. Most of the cranberries had migrated into the cake, but the nuts were left behind in the pan with the sugar. Now that won't do. That orange glaze really helped with the appearance of the cake. So just make sure that you HEAVILY grease your pan.

Friday, January 20, 2012

Food Storage Friday: Reuben Pinto Burgers

I found this recipe in the newspaper last Sunday. My burgers don't look as pretty, but they were very tasty, and really that's all that matters. (Ok, they are healthier than a standard burger, and I suppose that matters for something too.) If you are not fan of sauerkraut, you can easily change the toppings to make it whatever burger tickles your fancy.

Reuben Pinto Burgers
Food Storage Ingredients:
2 cans (15.5 oz)  pinto beans, liquid drained, 1 can mashed with a fork
1 can (14.5) sauerkraut, drained
1/4 cup canola oil
1 teaspoon ground pepper
1 teaspoon garlic powder
1/2 cup light mayonaise or Miracle Whip
2 Tablespoons of chili sauce

Fresh Ingredients:
1 & 1/4 cup dry bread crumbs
2 eggs, lightly beaten
6 thin slices Swiss cheese
6 whole wheat hamburger buns

1. Mix beans, bread crumbs, eggs, pepper, and garlic in a bowl. Form into six patties (Roughly 4"). 2.Mix chili sauce and mayo, set aside. 3. Place a slice of cheese on each half bun. Toast at 300 degrees F for about 5 minutes. 4. While toasting buns, heat oil in a large skillet. 5. Cook patties in hot oil until crisp on both sides (8-10 minutes total). 6. Assemble burgers with sauce on each side of bun and sauerkraut on top of patty.

Notes: The recipe I read said to drain and reserve liquid from canned beans, then add it to patty mixture for moisture. I found them to be plenty moist without it. I'll have to try this recipe with cooked dry pinto beans and with various burger toppings. I made my bread crumbs by toasting a couple of smashed freezer burnt Kaiser rolls that I found buried in my freezer and added a dash of Kirkland's organic no-salt seasoning. I highly recommend. I also used Monterrey Jack instead of Swiss, because that is what I had in my fridge. Still good.

Friday, January 6, 2012

Food Storage Friday: Baked Apple Pancakes

I based this recipe off one that I found in a food storage cookbook a few years ago. I know I found it in a food storage cookbook, but that doesn't mean that I would consider a food storage recipe since the only food storage ingredients that it called for were white flour, white sugar and spices. That's not really using your food storage, those are just common baking ingredients. It's like saying that living off Cheetos and breadsticks makes you a vegetarian. All-purpose white wheat flour is not meant for long term storage, it loses it's nutritional value too quickly. This dish is however tasty, and I changed the recipe so that it does actually incorporate food storage ingredients by substituting oat flour. I make my own oat flour by throwing oats in the blender for 10 seconds. Oats have a significantly longer shelf life than white flour. I make this whenever I have apples that have gone a little soft, but haven't gone bad yet. It is a favorite of Thing 1's. As I am currently doing the pantry challenge I used powdered eggs from my food storage. This time I used almond milk, but I have also made this with reconstituted powdered milk and it has worked just fine.

Baked Apple Pancake
Food Storage Ingredients:
2 Tablespoons sugar
1/2 teaspoon cinnamon
dash nutmeg
1 cup oat flour
1 teaspoon salt
powdered sugar (optional)
maple syrup (optional)
1 heaping tablespoon ground flax seed (optional)

Fresh Ingredients:
2 Tablespoons butter
2 apples, cored and diced
1 cup milk
6 eggs

1. Preheat oven to 400 degrees. 2. In a frying pan saute diced apples with butter, cinnamon and sugar until tender. Transfer to a sprayed cooking pan. 3. In a blender whip eggs, flour, milk, salt, nutmeg and flax seed. Pour over cooked apples. 4. Bake for 16-18 minutes. Dust with powdered sugar or top with syrup. Serves 6 and reheats well.

Friday, December 9, 2011

Food Storage Friday: Raspberry and Spinach Pasta Salad

I created this recipe with my extremely limiting dietary restrictions in mind using things I happened to have in my fridge and pantry. So if you aren't married to a vegetarian and you aren't breast-feeding an infant with moderately severe reflux, feel free to add some grilled chicken strips, mandarin oranges, feta cheese and/or chopped kiwi fruits. I actually can have kiwi, I'm just out.  You can serve it as a side (I had mine with grilled fish) or eat it as a light meal. Whatever floats your boat.

Raspberry and Spinach Pasta Salad
Food Storage Ingredients:
3 Tablespoons toasted almonds
2 cups cooked pasta
2 teaspoons of olive oil
1/4 cup raspberry vinaigrette dressing (I used Private Selections from Smith's because it doesn't use soybean oil.)

Fresh Ingredients:
handful of fresh raspberries, torn in half
1 Bartlett pear, chopped
1 large handful of baby spinach

1. Coat cooked pasta with olive oil. 2. Toss all ingredients together.

I love this because a) I'm allowed to eat it, b) it's healthy, c) it's delicious and satisfying and d) it's super quick and easy to make. We have a winner! If I were in a situation where I was using only my food storage I could use reconstituted dried raspberries and canned pears and probably just forgo the spinach. The fresh is better, but I could make do without.

Friday, November 25, 2011

Food Storage Friday: Vegan Pumpkin Waffles

 Lately I haven't been doing much with my food storage because there is so much of it that I can't eat due to the fact it makes my breast-feeding baby scream and vomit. Because of my dietary restrictions, I'm also getting very tired of the things that I can eat. I've gotten to the point where I usually would rather go hungry than have oatmeal for breakfast again. Enter friend Julie, who has also done a stint as a vegetarian. She gave me a recipe for these great pumpkin waffles that are satisfying and were a hit with all family members. Now that's saying something when you're cooking for my crew.  Thanks so much Julie! Of course I made a few changes so I was incorporating food storage and making them a little healthier. They're great with maple syrup or Apple Cider Sauce. Makes 12 waffles.

Vegan Pumpkin Waffles 
Food Storage Ingredients:
1/2 cup wheat flour
1/2 cup oat flour
1 1/2 cups all-purpose flour
2 1/2 teaspoons baking powder
1/2 teaspoon baking soda
2 teaspoons cinnamon
1/4 teaspoon cloves
1 teaspoon ground ginger
1/2 teaspoon ground nutmeg
1/2 teaspoon salt
1/3 cup brown sugar
1 15 oz can pumpkin (not pumpkin pie mix)
1/3 cup canola oil
1 Tablespoon vanilla extract

Fresh Ingredients:
2 cups rice, soy or almond milk*
1 Tablespoon ground flax seed*
1 Tablespoon wheat germ*

1. Thoroughly mix wet ingredients and sugar in a bowl. 2. In a separate (large) bowl, mix dry ingredients. 3. Combine wet and dry ingredients. 4. Spray waffle iron with non-stick cooking spray and prepare according to waffle iron instructions.

Notes: Currently I can't have soy or dairy, so I made these with almond milk. I imagine that someday when my diet is less restricted and I'm in a pinch, I'll use the powdered milk from my food storage. From what I have read whole flax seed has a shelf life of three to five years, while ground flax seed can go rancid in as little as a week. I generally grind a cup at a time and store it in the fridge. Ground flax seed is great vegan source of Omega 3, 6, & 9 fatty acids as well as fiber. Wheat germ is a good source of fiber and B vitamins. Whenever I make waffles I add both wheat germ and ground flax seed for their health benefits and the fact that you can't taste them. Both these ingredients are optional, but I figure if I can get my family to willingly eat better, why not?

Friday, October 21, 2011

Food Storage Friday: Plum Sauce

 Several weeks ago we found ourselves with a surplus of plums from our Bountiful Basket. I remember when I was growing up my mom and grandmothers canned plums and I thought that they were gross. But I decided that there had to be something delicious that I could do with these. The answer: Asian Plum Sauce.  Now this recipe itself calls for both fresh and food storage ingredients, but the real beauty of it is that once prepared it makes preparing quick and healthy meals  with food storage a snap. It goes well over stir-fried vegetables and rice.

Asian Plum Sauce
Food Storage Ingredients:
3 Tablespoons soy sauce
1 teaspoon canola oil
1/2 teaspoon crushed red pepper flakes
1 cup brown sugar
1 Tablespoon cornstarch + 1 Tablespoon water


Fresh Ingredients:
3 lbs plums, pitted and chopped
5 cloves garlic, minced
1/2 oz ginger
1 small onion, minced
2 cups water
1/4 cup lemon juice

1. Puree fresh ingredients. 2. Combine all ingredients except cornstarch and Tablespoon of water. 3. Bring to a boil and simmer 30 minutes. 4. Mix water and cornstarch, add to sauce and simmer until thickened. 5 Can in a water bath according to canner directions. (The recipe I found said 10 minutes, I felt more comfortable with 20.) Makes 4 pint jars


I served this over brown rice I had prepared in my crockpot and four cups of chopped and stir-fried mixed veggies. My husband added some stir-fried tofu to his, but you could just as easily stir-fry some chicken or pork and add that.

Friday, August 19, 2011

Food Storage Friday: Chile Verde Burritos

 Whenever I have made chile verde sauce my family pretty much inhales it. Here's the secret to my awesome chile verde sauce: I throw in a bunch of stuff until it looks and tastes right and call it good. The recipe below is what I did most recently, but I can't guarantee that it will turn out the same next time. Peppers have a tendency to vary in flavor and hotness. You can't look at a pepper and know how potent it is going to be. If I mix everything together and it's too bland I throw in a dash of green Tabasco or sprinkle in some red pepper flakes. If it needs to be toned down a notch, I'll finely chop up 1/2 a bell pepper and add that to the sauce. May the force be with you in your endeavors.

Chile Verde Burritos
Food Storage Ingredients:
Re-fried beans
Canned pork (optional)

Fresh Ingredients:
tortillas
grated cheese (I've used cheddar, colby, monterey, pepper jack, and mozzarella, all with great results.)
sour cream
1-2 cloves of garlic, peeled
4 Anaheim peppers
3 banana peppers
4 jalapeno peppers
8 tomatillos
4 green onions, chopped

1. Remove pepper stems, leave the seeds. Remove and save tomatillo husks. Cut tomatillos in half, hamburger style. 2. Roast peppers, garlic and tomatillos until well blistered. (Generally 45 minutes @ 375. I did mine in my sun oven, and it took an hour and a half before I was satisfied with their appearance, but it's cooking times will widely vary.) 3. Puree tomatillo husks and roasted vegetables. 4. Simmer pureed pepper mixture with green onions on low for 15-20 minutes or until desired thickness. Add pork if desired. 5. Assemble burritos as desired. (Whenever I make these I like to make extras and freeze them.)
I like my green sauce to be nice and thick.

Notes: I have found that the best re-fried beans come from the LDS Church canneries; they are so delicious. (Don't worry you don't have to be LDS to buy food storage there. They love to encourage everyone to be prepared.) I also love that they are not actually re-fried and are completely fat free, unlike real re-fried beans which are made with lard. (Bleh.) I have heard people complain that they are bland, but it is all in how you cook them. According to the instructions you mix the dried bean flakes in boiling water and let them set. Before I let them set I mix in a pepper. Either a dried and crumbled Chipotle pepper, a chopped Anaheim or whatever other spicy pepper I have convenient. After the beans have absorbed the water, add a heaping teaspoon of sour cream and a sprinkling of cheddar cheese. Mix it all together and it makes great burritos, improves 7 layer dip, makes an easy Mexican food side or stand alone bean dip.
When I say Anaheims I mean these beauties
 And as for Anaheims, some stores refer to them as Anaheims, others as Cubanos. I'm not sure why. And when I planted Anaheims in my garden, none of the plants I could find had pictures that looked anything like the Anaheim peppers that I am familiar with. And the peppers that grew were small and red.

Friday, August 12, 2011

Food Storage Friday: Stir-fried Green Beans with Rice

Sometime in the last month we got green beans in our Bountiful Basket. My husband has a tendency to turn his nose up at green beans and my kids won't try them either. One day I mentioned that we should eat them and my husband said "I can't imagine that there is anything you can do to green beans to make them delicious." I took this as a challenge. Heather has a tendency to be fairly irritated when someone tells her that she can't do something. When I was in college my department counselor laughed at me for a good 15 minutes when I told her I was thinking about graduating with University Honors. I did it and in less than four years too, so there.  So I turned to How to Cook Everything Vegetarian: Simple Meatless Recipes for Great Food  for ideas. I found a recipe for Twice-Fried Green Beans, that sounded like it had potential, except it involved deep-frying, which I am pretty aversive to. So I took all of the ingredients, stir-fried them and served them over rice. My husband loved it and admitted that green beans can taste good as long as they don't come from a can. He liked it so much that I caught him multiple times sticking his finger in the empty pan to scrape out the remains of the sauce. Mission accomplished.

Stir-fried Green Beans with Rice
Food Storage Ingredients:
rice, prepared per package directions
4 Tablespoons of oil
1/2 cup cashews
1/2 teaspoon red pepper flakes
2 Tablespoons soy sauce
1 Tablespoon sugar
dash of salt

Fresh Ingredients:
1 1/2 lbs fresh green beans
1 Tablespoon chopped garlic
1/2 cup scallions, chopped*

1. Stir-fry green beans in oil for ten minutes on medium heat. 2. Add cashews and cook until they just start to brown. 3. Add garlic, scallions, and red pepper flakes. Cook until onions turn clear. 4.  Add soy sauce and salt. 5. Sprinkle sugar evenly over vegetables. Saute until evenly coated with sauce. (It will be thick and sticky.) Serve over rice.

*The original recipe called for scallions, but I used the small red onions that I had just harvested from my garden with very satisfactory results.

Friday, August 5, 2011

Food Storage Friday and Vegetarian Link-Up

 My husband has recently decided to be a vegetarian. And I sort of follow suit because I don't want to bother making two or three meals every night. Right now I find that if I go two or three days without eating meat I start feeling weak and nauseated (more so than usual). I also found that when I don't eat meat I don't gain weight, which I need to be doing right now. I don't need a lot of meat to fix the problem, a turkey sandwich will usually do the trick, but I have to have meat. Perhaps I will give it a more concerted effort when I am not trying to grow a person in my belly. For now I cook vegetarian meals at home and when we go out to eat, or sometimes when I'm at work I eat meat. (The kids don't really like to eat meat anyway, except for the occasional chicken nugget.) So I'm eating some meat, but not very much.
 So why go vegetarian? Here are a few bonuses about the lifestyle:
  • It dramatically lowers your cholesterol and calorie intake.
  • Cutting out the meat significantly reduces your grocery bill.
  • Vegetarian protein sources are cheaper to store and last significantly longer in your food storage than canned or dried meat.
  • Meat is unfortunately "fortified" with steroids, antibiotics and growth hormones. None of which I recommend taking without a prescription.
  • It forces you to pay attention to think about what you are eating. While you are looking at the ingredients, it's more likely that you may be thinking 'Is this good for me?'
  • Vegetarians live longer and don't get sick as often.
  • Going vegetarian leaves a smaller carbon footprint.
 Here's the my vegetarian experiment of the week:

Crock Pot Pepper Pasta
Food Storage Ingredients:
2 cans (14.5 oz) diced tomatoes
1/8 cup olive oil
2 cans (6 oz) tomato paste
2 Tablespoons jarred, pre-chopped garlic
1 Tablespoon dried basil
1 Tablespoon dried oregano
1 teaspoon dried rosemary
1/2 teaspoon dried red pepper flakes
1 lb pasta, prepared according to directions

Fresh Ingredients:
3 bell peppers, chopped into 1 inch pieces
1 medium onion, chopped
6 Tablespoons shredded Parmesean

1. Mix everything except pasta and cheese together in crock pot. Cook on low for 7 hours or high for 3 hours. 2. When sauce is almost done prepare pasta. 3. Season sauce to taste. Serve with Parmesean.

This stuff made my house smell wonderful. I served it over whole wheat pasta with green apples and french bread (in the interest of providing something I could guarantee my kids would eat.) I thought the sauce was a little thinner than I liked, so next time I may drain one of the cans of tomatoes. My husband loved it the way it was and used his french bread to soak it up.

Now I am well aware that giving up meat is a huge life-style change. I obviously can not say that I have managed to do it. But if you can reduce the amount of meat that you're eating, think of the benefits. You will save money and improve your health, (which also saves you money). It has taken a little work and experimentation, but I have found myself trying and loving many foods that I never would have thought of trying before. Vegetarian cooking has also given me a boost of confidence in my culinary skills. Where my husband works they go out to eat/order in pretty frequently, and usually he's more interested in my leftovers than what is available at local restaurants. Haha!  So this week I am inviting anyone out there to share their favorite vegetarian recipes. And if it includes rice, pasta, oats, potatoes, wheat or beans, all the better!

Friday, July 29, 2011

Food Storage Friday: Bean Pancakes

Over a year ago I came across a recipe blog hop on Trying Our Best, (I love getting recipe ideas from other people.) which included a recipe from Sunrise on the Water for bean pancakes. I thought that I would give it a try, but of course I made several changes, shared it with my buddy Liesa who had some good suggestions and voila!- another happy food storage concoction. I love that this recipe is a good mix of fresh and food storage ingredients and in a pickle I could make it from all food storage ingredients. Plus it's healthy, easy to prepare and super cheap to make. Also if the name "bean pancakes" sounds too weird for you, try calling them bean tortillas, because really they're like a healthy tortilla, you just cook them like a pancake. You could easily fill them with eggs and green chiles or taco stuffings. Enjoy!

Bean Pancakes
Food Storage Ingredients:
1 15 oz can beans, rinsed, drained & mashed (I've done black or kidney, both are great, the pancakes pictured are made with black beans)
1 12 oz can evaporated milk
1&1/4- 1&1/3 cup wheat flour (depending on how moist your beans are)
2 Tablespoons canola oil
dash of lime pepper
a couple shots of Tabasco sauce (I prefer the green variety for this)
salsa for topping

Fresh Ingredients:
1-2 Tablespoons chopped fresh cilantro
1/2 teaspoon minced garlic
1 egg
shredded cheese
avocado sour cream or ranch dressing

1. Mix beans, milk, wheat flour, oil, pepper, Tabasco, cilantro, garlic and egg until a pancake consistency. There will still be chunks of beans, but you want to make sure that the flour is mixed in well. 2. Make into pancakes. While you are cooking the second side of the pancakes, sprinkle a little shredded cheese on top so it melts onto the pancake. 3. Top with salsa, avocados, sour cream or whatever you please.

 I served mine with Cafe Rio style rice, peach salsa and mango smoothies, but go with what sounds good to you. If you plan on stuffing them taco stuff I would add the lesser amount of wheat so they're a little thinner and easier to fold. As I'm writing this I just had the thought that next time I should add some green chiles or other peppers to the pancake mix. I'm sure it will be delicious. I'll let you know how it goes. Also I would advise against telling small children that these are pancakes. Both of my kids were pretty upset that I made them pancakes that we were not putting syrup on.


Friday, July 8, 2011

Food Storage Friday: No-Bake Energy Bars

Well  it's summer in St George and I have officially reached that point where I avoid using my oven at all costs. Recently I found this recipe for  no-bake energy bars and I am in love. I found the recipe on Skinny Bovine's Kitchen and she got it from Love Veggies and Yoga. I made a couple of minor changes. These things make a great breakfast on the go. Enjoy.

No-Bake Energy Bars
Food Storage Ingredients:
2 1/2 cups old fashioned oats
1/2 cup peanut butter
1/2 cup shredded coconut
1/3 cup chopped nuts (I used cashews)
1/2 cup maple syrup (the real stuff)
1/2 cup dried fruit (I used craisins)
1 tsp vanilla
1/2 tsp cinnamon
2 Tablespoons chocolate chips (optional)

Fresh Ingredients:
1 ripe banana, mashed
1 Tablespoon wheat germ (optional)

1. Mix all ingredients in a bowl. 2. Flatten on a cookie sheet lined with wax paper. (I found to fill a standard size cookie sheet you need to double the batch.) 3. Freeze for 8 hours, cut into bars, wrap in plastic wrap or individual baggies. Store in the freezer because they soften up quickly.

Eating these when they soften up reminds me of eating oatmeal cookie dough, but it's safer and healthier.

Friday, June 24, 2011

Food Storage Friday: Shepherd's Pie

 This is Thing 1's "favorite non-sugary food". And I love that it is super easy to make. I could probably get her to make it next time, if I cook the meat first, it's that easy. This is the way that my mom made shepherd's pie growing up and I love it, but I have since learned that shepherd's pie traditionally has green beans and some sort of tomato-based sauce. I really don't think that I could get my kids to eat something like that, but this way works for us. And when I take the leftovers to work I always get comments about how great it smells.


Shepherd's Pie
Food Storage Ingredients:
2 cans corn, drained
1 can cream of mushroom soup, undiluted
1 Tablespoon dried minced onions
3-4 cups prepared mashed potatoes

Fresh Ingredients:
1 lb cooked extra lean ground beef, drained
1/4 cup grated cheddar cheese

1. For bottom layer mix beef, onions and soup in a casserole dish. 2. Spread canned corn over meat mixture for second layer. 3 Spread mashed potatoes over corn. 4. Sprinkle with cheese. Cook until cheese is melted.

Usually I bake this in the oven at 350 for 15 minutes, but I'm trying not to turn the oven on these days. The dish I used was small enough that I cooked this in the microwave for a few minutes without any ill effects. Once I tried using half wheatberries to half ground beef. It was not a winner. The texture was just wrong. I also swear that I took a picture of this when I made it last, but it is MIA. I'm sure that you guys can use your imaginations to conjure it up in your minds.

Friday, June 17, 2011

Food Storage Friday: Banana Bread

This recipe is based loosely off of one from 101 Things to Do with a Cake Mix. (Which by the way I love.) There are probably banana bread recipes out there that are more wholesome and more strongly food storage based, but this one is so yummy and so easy. When we lived closer to my sister-in-law, she would baby-sit our kids in exchange for this banana bread.

Banana Bread
Food Storage Ingredients:
1 cup oatmeal
1 yellow cake mix
1 small box banana or vanilla pudding
1/4 cup oil
1/4 cup applesauce (I used some that I canned last fall, so yummy!)
3/4 teaspoon cinnamon
1 Tablespoon vanilla

Fresh Ingredients:
3 ripe medium bananas
3 eggs
1/2 cup water

1.Preheat oven to 350 degrees. 2. Mix all ingredients until smooth. 3. Divide between 2 greased bread pans. Bake for 45 minutes or until toothpick comes out clean.

Friday, June 10, 2011

Food Storage Friday: Beef, Wheat and Cheese Enchiladas

When my husband was growing up, one of this favorite foods was beef and cheese enchiladas. They're pretty straight forward- enchilada sauce, cooked ground beef, shredded cheddar cheese in a tortilla, smothered in more sauce and cheese. Bake until cheese is melted. They're all right; they're his comfort food, not mine. However, this week after he'd been in an accident, (An older gentleman possibly totaled our car, we're still waiting to hear.) I could tell that he needed some comfort food, so I made these with one significant change. I added food storage. Cooked wheat berries can be used to substitute part of the ground beef in a recipe, decreasing the saturated fat and increasing the folic acid and fiber content. I have tried just mixing wheat berries with the ground beef, however the texture just seemed wrong, but "mix it in a mincer and pretend it's beef" and it seems to work a little better. I can distinctly taste the wheat, but my husband still happily ate several. The same principle can be applied to many other recipes that call for ground beef.

Beef, Wheat and Cheese Enchiladas
Food Storage Ingredients:
1 cup cooked wheat berries
2 cups (approximately) enchilada sauce

Fresh Ingredients:
1 lb cooked ground beef (I prefer the extra lean variety)
tortillas (how many depends on the size, roughly one package of the 8" variety)
2 cups shredded cheddar cheese

1. Puree 1/2 cup enchilada sauce with wheat berries. (If your family is not used to eating cooked wheat, you may want to start with less than a cup so they don't have a fiber overload.) 2. Spread wheat mixture on tortillas, top with beef and cheese. 3. Roll and smother with remaining sauce and cheese. 4. Bake for 20 minutes at 350 or until cheese is melted.

Friday, June 3, 2011

Food Storage Friday: Mini Meatloaves and Mashed Potatoes

Surprisingly of all my food storage recipes, my meatloaf is the biggest crowd pleaser (with the exception of my wheatberry salsa, but that's more a snack than a meal.) This is unfortunate, because I generally try to avoid preparing meals that involve me squishing my fingers in raw meat.  My in-laws (who as a group are generally against eating healthy) love it and every time I bring the leftovers to work, someone asks me what in the world I am eating because it smells amazing. Seems like good enough tests for me. I found the recipe that I based this off of in Taste of Home's Budget Suppers. Of course I cut down the salt, doubled the whole grain and changed things up a bit to turn it into something I would want to eat. The secrets that makes this meatloaf so great are:
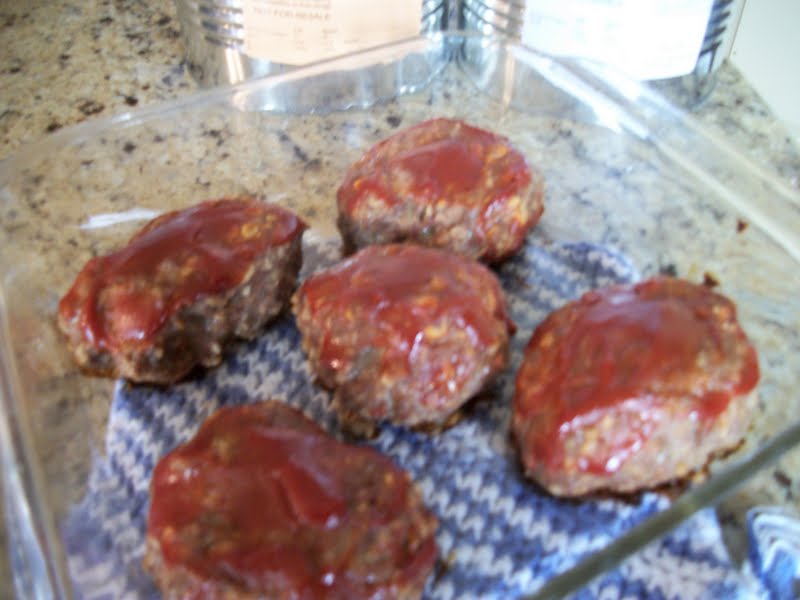
  1. The sauce on top
  2. They are smaller so they cook faster than the average meatloaf 
  3. The Worcestershire sauce inside to give it a little zip
Mini Meat Loaves
Food Storage Ingredients:
1 1/2 cups rolled oats
1/2 cup evaporated milk
3/8 cup dried minced onion
1/2 teaspoon salt
1/4 teaspoon black pepper
2 Tablespoons Worcestershire sauce
1 Tablespoon brown sugar
1/3 cup ketchup
1 Tablespoon prepared mustard
mashed potatoes, prepared according to directions

Fresh Ingredients
1 egg, lightly beaten
1 1/2 pounds extra lean ground beef

1. Mix oats, milk, egg, onions, salt, pepper and Worcestershire sauce in a bowl. 2. Mix in ground beef until mixed thoroughly. 3. Form into balls, (I make them slightly smaller than my fist, but I have small hands) I put a small dent in the middle with my thumb to thin out the part where the meat is the thickest to help make sure that they cook more evenly and also hold some of the sauce in. 4. Mix ketchup, brown sugar and mustard into a sauce and spoon over meatloaves. 5. Bake at 350 for 35-45 minutes. Serve with mashed potatoes and vegetables. Makes 10 mini meatloaves.


Notes: I feel like this meal is somewhat higher intensity than I usually do, so I serve it with mashed potatoes, which are like the fast food of the food storage world. These also freeze and reheat well.

Friday, May 20, 2011

Food Storage Friday: Chicken and Easy Fresh Pesto

Last Saturday when I got my fresh herb pack from Bountiful Baskets, I knew that I needed to make some fresh pesto, and as I was eating it I thought 'Why haven't I blogged about this before?' It's so easy and delicious. Enjoy.

Chicken, Pasta and Pesto
Food Storage Ingredients:
10 oz pasta, prepared al dente
1/2 cup olive oil
2 Tablespoons almonds, toasted
1/2 cup Italian dressing

Fresh Ingredients:
2 lbs of chicken
2 loosely packed cups fresh basil
2 cloves fresh garlic
1/2 cup grated Parmesan
dash of lemon juice
additional Parmesan for garnish (optional)

1. Marinate chicken overnight in Italian dressing. Or to make life easier follow these instructions. 2. Cook chicken as desired. Grill it, bake it, whatever pleases you. My favorite is to throw it in my medium-sized crock pot frozen and cook on low for 8-10 hours. 3. When you are almost ready to eat, puree almonds, cheese, lemon juice, olive oil, garlic and basil in a food processor to desired coarseness. 4. Spread over chicken and pasta.

Notes: The recipe that I originally based my pesto on called for salt. I feel like the cheese makes it salty enough, but if you like it saltier, by all means. Pesto traditionally calls for pine nuts or sometimes walnuts. I use almonds for two reasons. a) I do not like pine nuts or walnuts. b)Almonds are significantly less than pine nuts or walnuts. Once when I was a girl my grandpa took me up in the mountains to hunt for pine nuts. I decided that it was way too much work for something that just didn't taste that great. (The last time I was at Costco, a 3 lb bag of pine nuts was about $28. I'll stick with almonds, thank you.) I also keep a jar of pesto in my pantry, just in case. Since this is a meal my family is familiar with, we could get by on a meal of jarred pesto and pasta, but the fresh is much better.
 If you happen to have a large quantity of fresh basil (whether from your garden or your Bountiful Basket), you can make this and freeze it. Just leave out the oil and cheese and add those when you are ready to serve. Usually I make my pesto as I have spelled out above. This time I added a touch of fresh oregano, thyme and rosemary because I had them. Very delicious.